
No-Bake Peanut Butter Oat Cups are the perfect treat for any occasion. With their rich peanut butter flavor and satisfying crunch, these delightful cups are a hit for gatherings, snacks, or a sweet craving. The best part? They come together without baking, making them easy to whip up anytime!
Why You’ll Love This Recipe
- Quick and Easy: These oat cups require minimal preparation time, making them a breeze to create.
- Delicious Layers: Enjoy the delightful combination of creamy peanut butter, rich chocolate, and crunchy oats in every bite.
- Versatile Treats: Perfect as a dessert, snack, or even breakfast on the go!
- Healthy Ingredients: Made with wholesome oats and natural sweeteners, they offer a guilt-free indulgence.
- No Baking Required: Save time and energy with this simple no-bake recipe.
Tools and Preparation
Having the right tools makes preparing No-Bake Peanut Butter Oat Cups a smooth process. Gather these essential items before you start!
Essential Tools and Equipment
- Muffin pan (metal or silicone)
- Mixing bowls
- Microwave-safe bowls
- Spoon or spatula
Importance of Each Tool
- Muffin pan: This is crucial for shaping your oat cups. A silicone muffin pan allows for easy removal.
- Mixing bowls: Use these to combine ingredients efficiently and keep your workspace organized.
- Microwave-safe bowls: Ideal for melting chocolate and mixing peanut butter without risk of damage.
Ingredients
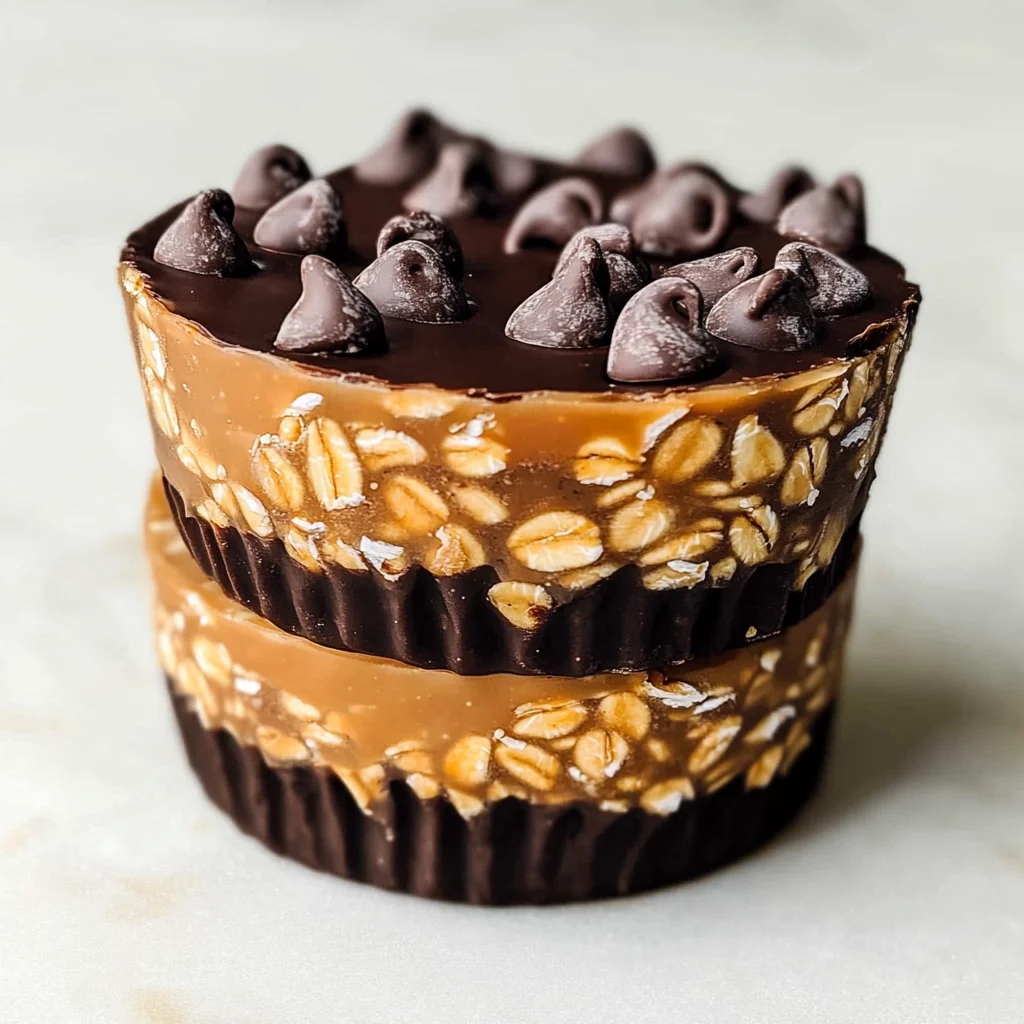
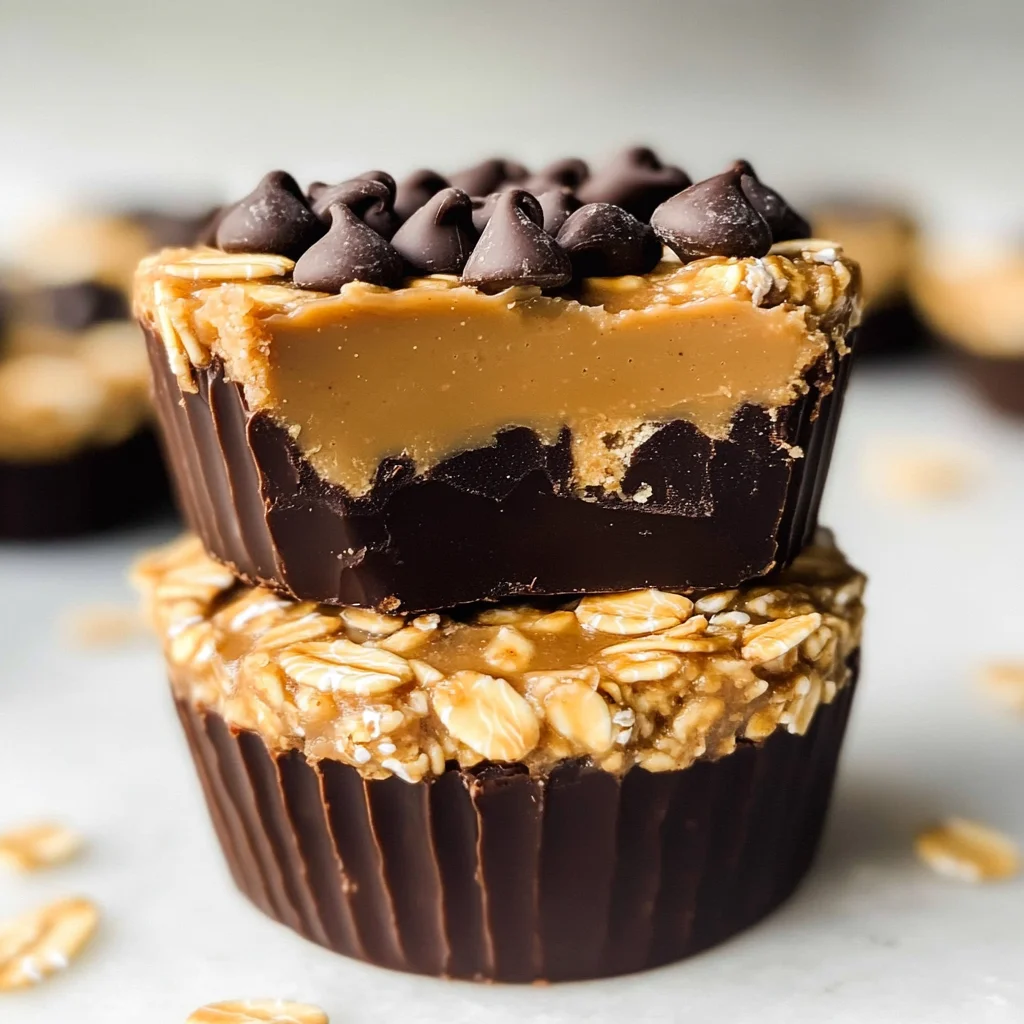
This delicious no bake dessert is made with 3 layers creating the most delicious peanut butter chocolate oat cups.
For the Oat Layer
- 2 cups quick-cooking oats
- ½ cup honey
- ⅓ cup all-natural, creamy peanut butter
- ⅓ cup chopped peanuts
- Optional: 1-2 teaspoons water
For the Chocolate Layer
- 6 oz. dark chocolate (chopped)
- 2 teaspoons coconut oil
For the Peanut Butter Layer
- ½ cup all-natural, creamy peanut butter
- 1 teaspoon coconut oil
- ¼ cup mini chocolate chips
How to Make No-Bake Peanut Butter Oat Cups
Step 1: Prepare the Muffin Pan
Line a metal muffin pan with paper liners or use a silicone muffin pan (no need to line the silicone pan).
Step 2: Make the Oat Layer
- In a bowl, combine the quick-cooking oats, honey, creamy peanut butter, and chopped peanuts.
- Stir until well mixed. If it appears dry, add 1-2 teaspoons of water to reach your desired consistency.
- Scoop about 2 tablespoons of this mixture into each muffin cup. Firmly press it down to form an even layer.
Step 3: Create the Chocolate Layer
- In a microwave-safe bowl, combine the chopped dark chocolate and coconut oil.
- Heat in 20-second increments on high power until melted, stirring between each increment until smooth.
- Scoop about 2 teaspoons of melted chocolate over each oat layer. Swirl gently to spread it evenly over the oats.
- Place the muffin pan in the freezer for about 5 minutes to set.
Step 4: Prepare the Peanut Butter Layer
- In another microwave-safe bowl, mix together the creamy peanut butter and coconut oil.
- Microwave for 15 seconds or until warm; stir until combined.
- Add about 2 teaspoons of this mixture on top of each chocolate layer and swirl gently again to smooth it out.
- Finally, sprinkle mini chocolate chips over each cup.
Step 5: Freeze Until Set
Place the muffin tin in the freezer for at least 30 minutes to an hour until fully set.
Step 6: Store Your Oat Cups
Once set, carefully remove each cup from the muffin pan and transfer them into a freezer bag for storage in your freezer.
Now you have delicious No-Bake Peanut Butter Oat Cups ready to enjoy!
How to Serve No-Bake Peanut Butter Oat Cups
No-bake peanut butter oat cups are a delightful treat that can be enjoyed in various ways. Whether you’re serving them at a gathering or enjoying them as a snack, these versatile cups can be paired with different accompaniments to enhance their flavor and texture.
With Fresh Fruit
- Sliced Bananas: The creaminess of bananas complements the peanut butter perfectly.
- Berries: Strawberries, blueberries, or raspberries add a refreshing tartness that balances the sweetness of the cups.
- Apple Slices: Crisp apple slices provide a crunchy contrast to the soft oat cups.
As a Breakfast Option
- With Yogurt: Serve alongside your favorite yogurt for added protein and creaminess.
- Drizzled with Honey: A drizzle of honey over the top adds an extra touch of sweetness for breakfast.
- Topped with Granola: Adding granola gives a nice crunch and makes for a hearty morning meal.
For Parties or Gatherings
- On a Dessert Platter: Arrange these oat cups on a colorful platter with other treats for an eye-catching display.
- With Ice Cream: Pairing them with vanilla or chocolate ice cream creates an indulgent dessert experience.
How to Perfect No-Bake Peanut Butter Oat Cups
Perfecting your no-bake peanut butter oat cups can elevate them from good to great. Here are some tips to ensure you achieve the best results.
- Use Fresh Ingredients: Fresh oats and peanut butter will enhance the flavor of your cups.
- Adjust Sweetness: If you prefer less sweetness, reduce the honey gradually until you find your ideal balance.
- Press Firmly: Make sure to press the oat mixture firmly into the muffin pan for a solid base that holds together well.
- Microwave Carefully: Heat chocolate in short increments to avoid burning it; stir often for smooth melting.
- Experiment with Add-ins: Try adding chia seeds or flaxseeds for extra nutrients and texture.
- Store Properly: Keep your oat cups in an airtight container in the freezer to maintain freshness.
Best Side Dishes for No-Bake Peanut Butter Oat Cups
These no-bake peanut butter oat cups pair well with several side dishes that make them even more enjoyable. Here are some excellent options.
- Fruit Salad: A vibrant mix of seasonal fruits adds freshness and color to your plate.
- Chia Pudding: Creamy chia pudding offers additional nutrition and pairs well with peanut flavors.
- Nutty Trail Mix: A blend of nuts, seeds, and dried fruits creates a satisfying crunch alongside the soft oat cups.
- Smoothie Bowl: A thick smoothie bowl topped with fruits and nuts makes for a fun and healthy side.
- Rice Cakes with Nut Butter: Light rice cakes spread with nut butter enhance the nutty goodness theme.
- Vegetable Sticks with Hummus: Crisp veggies dipped in hummus provide a savory contrast to sweet oat cups.
Common Mistakes to Avoid
Making No-Bake Peanut Butter Oat Cups can be a delightful experience, but here are some common pitfalls to steer clear of.
- Overmixing the Oat Layer – Stir the oat mixture just until combined. Overmixing can make it too dense and difficult to press into the muffin cups.
- Not Melting Chocolate Properly – Heat chocolate in short bursts and stir in between. This prevents burning and ensures a smooth texture for your chocolate layer.
- Skipping the Freezer Step – Don’t skip freezing between layers. This helps each layer set properly and creates distinct layers in your oat cups.
- Using the Wrong Type of Peanut Butter – Stick with all-natural, creamy peanut butter for the best flavor and texture. Avoid brands with added sugars or oils.
- Overloading on Toppings – While toppings are fun, too many can overpower the flavor balance. Stick to a moderate amount of mini chocolate chips for the best result.
Storage & Reheating Instructions
Refrigerator Storage
- Store in an airtight container for up to 1 week.
- Ensure they are cooled completely before sealing to avoid moisture buildup.
Freezing No-Bake Peanut Butter Oat Cups
- Place in a freezer bag or airtight container for up to 3 months.
- Separate layers with parchment paper if stacking to prevent sticking.
Reheating No-Bake Peanut Butter Oat Cups
- Oven – Preheat to 350°F (175°C) and warm for about 5 minutes. Use foil to prevent them from drying out.
- Microwave – Heat in 10-second intervals until softened. Be careful not to overheat.
- Stovetop – Place in a pan over low heat, cover, and warm gently until desired temperature is reached.
Frequently Asked Questions
Here are some common questions about making No-Bake Peanut Butter Oat Cups.
Can I use crunchy peanut butter instead of creamy?
Yes, you can use crunchy peanut butter. It will add texture but may change how well the layers stick together.
How long do No-Bake Peanut Butter Oat Cups last?
They last up to one week in the refrigerator or three months if frozen properly.
What can I substitute for honey?
You can use maple syrup or agave nectar as an alternative sweetener in this recipe.
Are No-Bake Peanut Butter Oat Cups healthy?
Yes! They contain wholesome ingredients like oats, peanut butter, and dark chocolate, making them a nutritious treat when enjoyed in moderation.
Can I customize the toppings?
Absolutely! Feel free to add other toppings like dried fruits or seeds based on your preference.
Final Thoughts
No-Bake Peanut Butter Oat Cups are not only simple to make but also incredibly versatile. You can customize them with various toppings or adjust sweetness levels according to your taste. Try these delicious treats today; they’re perfect for snacks or dessert!

No-Bake Peanut Butter Oat Cups
Indulge in the delightful No-Bake Peanut Butter Oat Cups, a treat that combines the rich flavors of creamy peanut butter and decadent chocolate with the satisfying crunch of oats. These cups are perfect for any occasion—whether you’re hosting a gathering, looking for a quick snack, or satisfying your sweet tooth. With minimal preparation and no baking involved, these delicious cups come together effortlessly, making them an ideal option for busy days or spontaneous cravings. Each layer offers a perfect balance of taste and texture, ensuring every bite is as enjoyable as the last.
- Total Time: 15 minutes
- Yield: Makes approximately 12 oat cups 1x
Ingredients
- 2 cups quick-cooking oats
- ½ cup honey
- ⅓ cup all-natural, creamy peanut butter
- ⅓ cup chopped peanuts
- 6 oz. dark chocolate (chopped)
- 2 teaspoons coconut oil
- ½ cup all-natural, creamy peanut butter
- 1 teaspoon coconut oil
- ¼ cup mini chocolate chips
- Optional: 1-2 teaspoons water
Instructions
- Prepare a muffin pan by lining it with paper liners or using a silicone muffin pan.
- In a mixing bowl, combine oats, honey, creamy peanut butter, and chopped peanuts. Mix well and add water if needed for consistency.
- Press about 2 tablespoons of the oat mixture into each muffin cup to form the base.
- Melt dark chocolate with coconut oil in a microwave-safe bowl until smooth. Pour over the oat layer and freeze briefly.
- Mix the remaining peanut butter and coconut oil, spread on top of the chocolate layer, and sprinkle mini chocolate chips.
- Freeze until set (about 30-60 minutes), then store in an airtight container in the freezer.
- Prep Time: 15 minutes
- Cook Time: 0 minutes
- Category: Dessert
- Method: No-Bake
- Cuisine: American
Nutrition
- Serving Size: 1 oat cup (40g)
- Calories: 174
- Sugar: 12g
- Sodium: 36mg
- Fat: 9g
- Saturated Fat: 3g
- Unsaturated Fat: 6g
- Trans Fat: 0g
- Carbohydrates: 22g
- Fiber: 2g
- Protein: 4g
- Cholesterol: 0mg